


")


")
")
")
")
 – quản lý kinh tế xã hội")


Ở bài này chúng ta sẽ tìm hiểu cách lấy thông tin của đối tượng trên bản đồ bằng cách kick chuột vào đối tượng.
Đầu tiên chúng ta thêm một thẻ div để hiển thị thông tin lên trang như sau:
<divid="info"></div>
Sau đó thêm sự kiện click vào bản đồ như sau:
map.on('singleclick', function(evt) {document.getElementById('info').innerHTML = "Loading... please wait...";var view = map.getView();var viewResolution = view.getResolution();var source = ThuaDat.getSource();var url = source.getGetFeatureInfoUrl(evt.coordinate, viewResolution, view.getProjection(),{'INFO_FORMAT': 'text/html', 'FEATURE_COUNT': 50});if (url) {document.getElementById('info').innerHTML = '<iframe seamless src="' + url + '"></iframe>';}});Sau khi click vào bản đồ thì đối tượng tìm thấy sẽ hiển thị như ở dưới.

Với cách này thì chúng ta sẽ hiển thị tất cả thuộc tính của đối tượng và không tùy chỉnh được. Để có thể kiểm soát được data chúng ta sẽ không lấy dữ liệu kiểu iframe ‘text/html’ nữa mà chuyển sang ‘application/json’ và sẽ request để lấy dữ liệu, dùng javascript parse json để phân tách các phần tử của đối tượng tìm được, sau đó dùng data đó hiển thị theo cách chúng ta muốn. Chúng ta viết lại sự kiện singleclick như sau:
map.on('singleclick', function (evt) {var view = map.getView();var viewResolution = view.getResolution();var source = ThuaDat.getSource();var url = source.getGetFeatureInfoUrl(evt.coordinate, viewResolution, view.getProjection(),{ 'INFO_FORMAT': 'application/json', 'FEATURE_COUNT': 50 });if (url) {$.ajax({type: "POST",url: url,contentType: "application/json; charset=utf-8",dataType: 'json',success: function (n) {var content = "<table>";for (var i = 0; i < n.features.length; i++) {var feature = n.features[i];var featureAttr = feature.properties;content += "<tr><td>Số thửa:" + featureAttr["shthua"]+ "</td><td>Số tờ bản đồ:" + featureAttr["shbando"]+ "</td><td>Diện tích:" + featureAttr["dientich"]+ "</td><td>Loại đất:" + featureAttr["kh2003"]+"</td></tr>"}content += "</table>";$("#info").html(content);}});}});
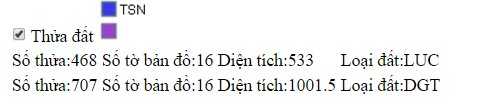
Ở đây chúng ta thấy { ‘INFO_FORMAT’: ‘application/json’, ‘FEATURE_COUNT’: 50 }); info format đã chuyển thành application/json do vậy chúng ta có thể dùng $.ajax của jquery để request nó sau đó trả về giá trị. Các bạn có thể tìm hiểu thêm về Jquery Ajax để hiểu rõ hơn cách load ajax nhé. Sau đó chúng ta sẽ parse Json để lấy các giá trị chúng ta cần. $(“#info”).html(content); để đưa toàn bộ content vào thẻ div id=info. featureAttr[“shthua”] thì shthua là tên trường trong database của chúng ta.Các bạn có thể sửa lại tên trường theo database của mình, hiển thị như thế nào thì tùy mỗi người, ở đây đơn giản chỉ đưa ra một bảng dữ liệu như hình
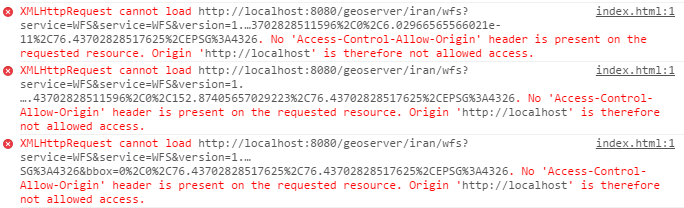
Chú ý: Trong trường hợp hàm trên không chạy được, các bạn ấn F12 trên trình duyệt , mở thẻ Console các bạn gặp lỗi:
No ‘Access-Control-Allow-Origin’ header is present on the requested resource. Origin ‘http://localhost’ is therefore not allowed access.
Nghĩa là Tomcat của chúng ta chưa config Cross-Domain requests, để config chúng ta vào <thư mục Tomcat>/conf/web.xml. Tìm đến phần config cho filter (Built In Filter Mappings được comment), thêm như sau:
<filter><filter-name>CorsFilter</filter-name><filter-class>org.apache.catalina.filters.CorsFilter</filter-class><init-param><param-name>cors.allowed.origins</param-name><param-value>*</param-value></init-param><init-param><param-name>cors.allowed.methods</param-name><param-value>GET,POST,HEAD,OPTIONS,PUT</param-value></init-param><init-param><param-name>cors.allowed.headers</param-name><param-value>Content-Type,X-Requested-With,accept,Origin,Access-Control-Request-Method,Access-Control-Request-Headers</param-value></init-param><init-param><param-name>cors.exposed.headers</param-name><param-value>Access-Control-Allow-Origin,Access-Control-Allow-Credentials</param-value></init-param><init-param><param-name>cors.support.credentials</param-name><param-value>true</param-value></init-param><init-param><param-name>cors.preflight.maxage</param-name><param-value>10</param-value></init-param></filter><filter-mapping><filter-name>CorsFilter</filter-name><url-pattern>/*</url-pattern></filter-mapping>
Khởi động lại Tomcat và chạy lại để xem kết quả.
Code toàn bộ bài :
<head><title>Openlayers test</title><style>.map {height: 100%;width: 100%;}</style><script type="text/javascript">var ThuaDat;$("#document").ready(function () {var format = 'image/png';var bounds = [592435.5625, 2286018.5,593105.1875, 2286636];ThuaDat = new ol.layer.Image({source: new ol.source.ImageWMS({ratio: 1,params: {'FORMAT': format,'VERSION': '1.1.1',STYLES: '',LAYERS: 'dc:TD_12646',}})});var projection = new ol.proj.Projection({code: 'EPSG:3405',units: 'm',axisOrientation: 'neu'});var view = new ol.View({projection: projection});var map = new ol.Map({target: 'map',layers: [ThuaDat],view: view});//map.getView().fitExtent(bounds, map.getSize());map.getView().fit(bounds, map.getSize());$("#chkThuaDat").change(function () {if ($("#chkThuaDat").is(":checked")) {ThuaDat.setVisible(true);}else {ThuaDat.setVisible(false);}});map.on('singleclick', function (evt) {document.getElementById('info').innerHTML = "Loading... please wait...";var view = map.getView();var viewResolution = view.getResolution();var source = ThuaDat.getSource();var url = source.getGetFeatureInfoUrl(evt.coordinate, viewResolution, view.getProjection(),{ 'INFO_FORMAT': 'application/json', 'FEATURE_COUNT': 50 });if (url) {$.ajax({type: "POST",url: url,contentType: "application/json; charset=utf-8",dataType: 'json',success: function (n) {var content = "<table>";for (var i = 0; i < n.features.length; i++) {var feature = n.features[i];var featureAttr = feature.properties;content += "<tr><td>Số thửa:" + featureAttr["shthua"]+ "</td><td>Số tờ bản đồ:" + featureAttr["shbando"]+ "</td><td>Diện tích:" + featureAttr["dientich"]+ "</td><td>Loại đất:" + featureAttr["kh2003"]+"</td></tr>"}content += "</table>";$("#info").html(content);}});}});});</script></head><body><div id="map" class="map"></div><input type="checkbox" id="chkThuaDat" checked /><label for="chkThuaDat">Thửa đất</label><img src="http://localhost:8080/geoserver/wms?REQUEST=GetLegendGraphic&VERSION=1.0.0&FORMAT=image/png&LAYER=dc:TD_12646" /><div id="info"></div></body></html>
Tác giả: Đỗ Xuân Cường
Nguồn bài viết: cuongdx313.wordpress.com


